Let your Chickens dig your Garden
No Dig Chicken Garden
Chickens love fresh air and exercise. They do best on a varied diet that includes greens and bugs. One can’t let the hens out to free-range unless someone is watching because of hawks and dogs that live nearby. So, for much of the day chickens are confined to a packed-dirt pen, but not with a Chicken Garden
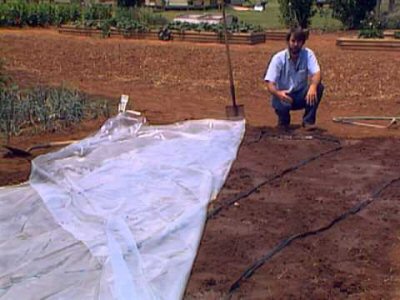
How to Build a Chicken Garden — The first thing to do to have a Chicken Garden is to Solarize. Solarizing is a simple non-chemical environmentally friendly technique that captures the heat from the sun, and cooks the soil.
Why Solarize?
 Solarizing does many things. It kills off pests, some weeds and pathogens. This leaves less stresses for the plants to have to compete. The process of solarizing also breaks down organic matter making the nutrients more readily available for the plants to use.
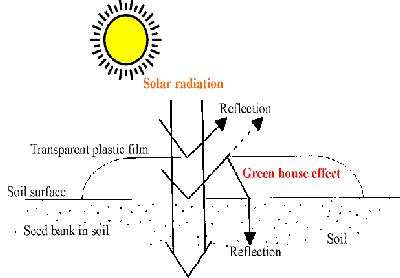
How Does Solarization Work?
Solarization works the same way a greenhouse does. A clear covering lets in, then traps, the suns radiant heat. In this case, a sheet of clear plastic is placed on the soil for 4-8 weeks, usually during the hottest months of the year. Clear plastic is used so the light and heat can go through. One would think that black plastic would get hotter, and IT did. But it got hotter by absorbing the heat itself. The added heat did not get through to the soil where you want it to go. The sunlight will pass through the clear plastic and be trapped there, heating up your soil and killing all those bad nasties. Moist soil is best for Solarization as moisture helps to conduct the heat transmitting it deeper into the soil. When done effectively, the top 6″ of soil will heat up to 140°. This can reduce the pest population for three to four months, or sometimes even longer, giving your garden a good head start.
How to Solarize Your No Dig Chicken Garden
 Pick your 12 X 12 area. If it is a lawn, cut it very, very short. Make the surface as smooth and even as possible.
- Irrigate to saturate the soil one to two feet deep.
- Cover the area with 2 to 4 mil plastic sheet in a 12 ft X 10 ft area. Spread the plastic so it is in contact with the soil surface, and leave as little air space as possible.
- Extend the plastic six to eight inches beyond the edges of the area. The edges don’t heat as well as the center so extending the plastic ensures even heating throughout.
- If the area is large enough to need several sheets of plastic, overlap the seams.
- Anchor around the edges of the plastic with rocks, bricks, wood planks, mounds of soil, etc.
- Wait six to eight weeks.
- Remove the plastic carefully. If the plastic doesn’t have UV inhibitor. To make the process even more effective, spread a second layer of plastic over the first. Use planks of wood or bricks to create a few inches of air gap between them. Research shows that the second plastic layer raises soil temperature another 2 to 10 degrees.
After Solarization
Since the plastic is clear, you can watch the lawn turn from green to yellow, then to straw brown. Once that happens, let the plastic sit another week or two, just to be sure.
Since solarization works best in the upper foot or so of soil, don’t rototill the soil after you are done. It’s best not to rototill ever. Rototilling, or turning the soil deeply, brings seeds and pathogens to the surface where they will proliferate.
This works best in full sun. If you have an area you wish to solarize that is in only partial sun, you can do it. The soil may not get as hot and kill all that you wish, but it still may help. You can also leave the plastic on longer to increase the killing potential. If you are in a cooler climate or conditions are not the ideal, you might try a double layer of clear plastic. Put down your first layer, then a few small stones, plastic bottles or PVC pipe you can use as spacers. Not too thick. You want as much light to get through as possible. Then put down a second layer of clear plastic on top. This will give you an insulating layer to help raise the temperature a few more degrees. Solarization can be done on flat or raised beds.
Best Time to Solarize
This works best during your hottest time of the year. In the Northern Hemisphere that would be June, July & August, but you can use this technique at other times. but remember, the cooler the temperature and the less direct sun light it gets, the longer the plastic needs to stay on for the desired effect. Highest soil temperatures occur when days are long, air temperatures are high, and skies are clear.
Should You Irrigate
Before you place the plastic on your rows, water them well. To at least 12″ deep. You want the soil good and moist so the heat is conducted deeper into the soil. You also want the plastic touching the soil. If the plastic is raised above the soil, such as from bumpy clumpy clods of dirt, the condensation will accumulate on the plastic, reducing the greenhouse effect. Raise the center of the bed to form a small “crown” to enable the covered bed to shed water. Water standing on the plastic absorbs the heat from the soil.
How Long Should You Solarize?
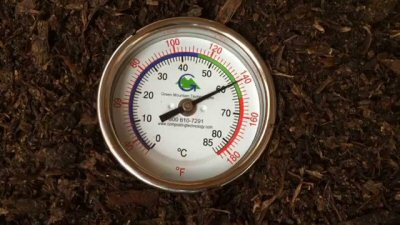
That depends on a lot of issues. How long have you got? Some solarization is better than none. So if you only have a couple of weeks, give it a try. The longer you leave it, and the hotter it is, the better it will work. Optimally, 4-6 weeks in the heart of the season. Remember the goal is to bring the soil to at least 140° and hold it there until the pathogens are killed. So the longer you can leave it the better. Solarization is both time and temperature dependent. The cooler the soil temperatures, the longer the plastic needs to remain in place to raise the temperature to the desired levels. The goal is to maintain daily temperatures in the top 6 inches of soil at or above, 110° to 125°F. You can use a soil thermometer or temperature probe to check the temperature if you wish.
Beneficial Soil Organisms
Although many soil pests are killed by solarization, many beneficial soil organisms are able to either survive solarization or recolonize the soil very quickly afterwards. Some of these beneficial are mycorrhizal fungi that aid plant growth. Also earthworms are thought to burrow deeper into the soil to escape the heat. You can also give this a boost by using our Worm Module©. If you add a handful of new worms from my worm bin and feed them all well.
What to do After You Solarize
- Remove the plastic film
- Put down a layer of cardboard.
Make Compost
The second phase of the Chicken Garden is to make a pile of compost. It is a well-known fact that composting is a process driven by aerobic microorganisms. These microorganisms need oxygen. The Chicken Garden has a unique way to make the fresh oxygen available.
Compost consists of four parts:
 Solid material: (organic and inorganic particles) Compost material is often very inhomogeneous. Green waste collected from yards often contains larger volumes of grass clippings or leaves without any other materials mixed in. For optimal starting conditions the input material should be a mixture, but in the Chicken Garden System it is not necessary. To make Chicken Garden Compost in the least amount of time, the solid material should be in the ratio of 30 parts of carbon and 1 part of Nitrogen. We will be using Wood Chips, which is very high with carbon.
 Liquid: (water) All water not bound for surface moistening of the solid particles will remain in the free space between the particles. Sooner or later this excess water follows the way of gravity down. During the composting process water is evaporated from the compost material because of high process temperatures. This water has to be replaced. The water in the Chicken Compost System is where the Nitrogen is introduced in the wood chips. It comes in the form of High Nitrogen Fertilizer or Liquid Gold. Liquid Gold is urine. The Stockholm Environment Institute conducted experiments and collected data that shows the usefulness of this resource. Ninety five (95%) of the of the urine each person produces per day is water, but the last 5% is comprised of both the macro-nutrients all gardeners are familiar with — Nitrogen (N), Phosphorous (P), and Potassium (K) — as well as some trace micro-nutrients. While the actual content will vary slightly depending on your diet, urine is generally a well balanced nitrogen rich fertilizer straight out of your body.
Some of the yearly values of the nutrients are:
- 3.5kg of nitrogen
- 0.5kg phosphorus
- 1.0kg potassium
- 0.5kg sulfur
- 40g magnesium
- 100g calcium
A family of four can produce the equivalent of a 50kg bag of NPK fertilizer from urine alone every year. This urine has a 10:1:4 ratio of nutrients. This shows a higher nitrogen content than many mineral fertilizers. Another positive effect of using urine is that the phosphorous is in a plant usable form, requiring no additional processing before it can be absorbed. There is no good reason to concentrate urine destined for use as fertilizer.
3. Air: (free air space between particles). Sufficient fresh air supply can achieve by using the “Chimney Effect.” High temperatures can be created an air flow from the bottom to the top. Used air with high carbon dioxide content is leaving on top while fresh air is forced into the system from the bottom. The Chicken Garden System uses an under pile ventilation an Air Pipes System with an Automatic Air Timer Control.
Air Pipes System consist of ½” PVC and air pump and is laid in the center on top of the cardboard.
Liquid Gold Systems is made the same way of the Air Pipe System above except it is attached is a pump with a timer and Liquid Gold or High Nitrogen Fertilizer tank for a source of Nitrogen.
 Build a pile of Wood Chips 6-foot-high and 10 foot wide. Set the Air Pipe timer to 10 periods of 4 minutes over a 24-hour time period. The Liquid Gold Pipe system is run to keep the moisture level a good level. There will be no smells or odors if a temperature a consistent of 140 degrees is maintained.
4. Agitation: (turning the compost pile) To understand the role of agitation in composting process we again need to have a look into the microcosm of the compost material. During the process the compost solid material is compacted by its own weight. Microorganisms make use of the organic matter after a while larger particles break down to smaller ones. When the free air space between particles becomes smaller, the competition between air and water went stronger. If the water cannot disappear the space for air becomes less and finally insufficient for free air exchange and causes a lack of oxygen supply. Even forced aeration systems cannot longer achieve homogeneous air distribution because larger air channels will build inside the compost material. Large air volumes using these channels causing excessive dry out of the zones around the air channels while other parts of the material will no longer receive any airflow. Anaerobic zones will build causing bad smell and slow down of the composting process. The agitation is done with Chickens.
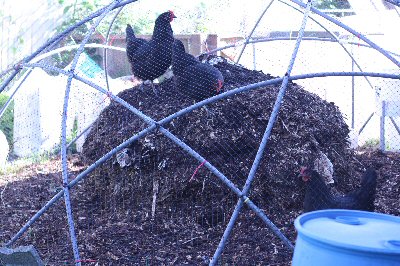
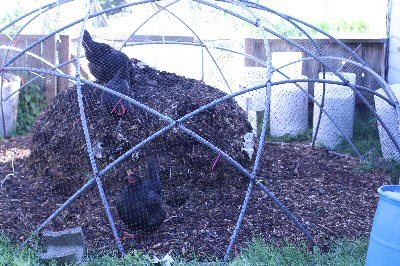
Bring on the Chickens
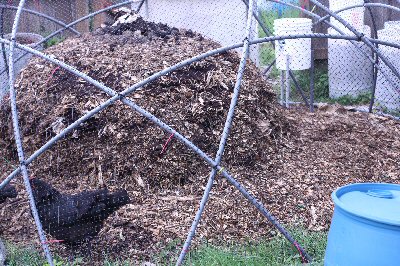 Place a twelve (12) foot diameter Chicken Dome over and around the Compost pile
Place the Chickens, Roosting Module, Automatic Waterer, No Waste Chicken Feeder into the Dome
Let the Chicken make start the agitation of the Compost Pile
If you build a compost pile then the chickens will eat what they like, and shred everything else into little bits. In the summer it becomes a cool, damp respite from the heat. All year long, this method of turning waste into compost is barely any effort for any person, if they understand the secrets of Chicken Gardening – the chickens do all of the work of mincing the material and turning it over. Soon enough, it decomposes, shrinks in size, and it turns into good garden soil.
So long as the blower runs according to schedule, you keep the pile moisture level correct and the pile has regular temperature of 140 degrees you will be have a garden ready to plant in 45 – 60 days.
82 Siletz Hwy Lincoln City OR 97367


You must be logged in to post a comment.